¶ Fields Editor
The Fields Editor opens automatically after completing the envelope or template creation wizard. It is where you place fields on your documents to define exactly where each recipient needs to interact — sign, fill in their name, enter a date, and so on.
¶ Layout overview
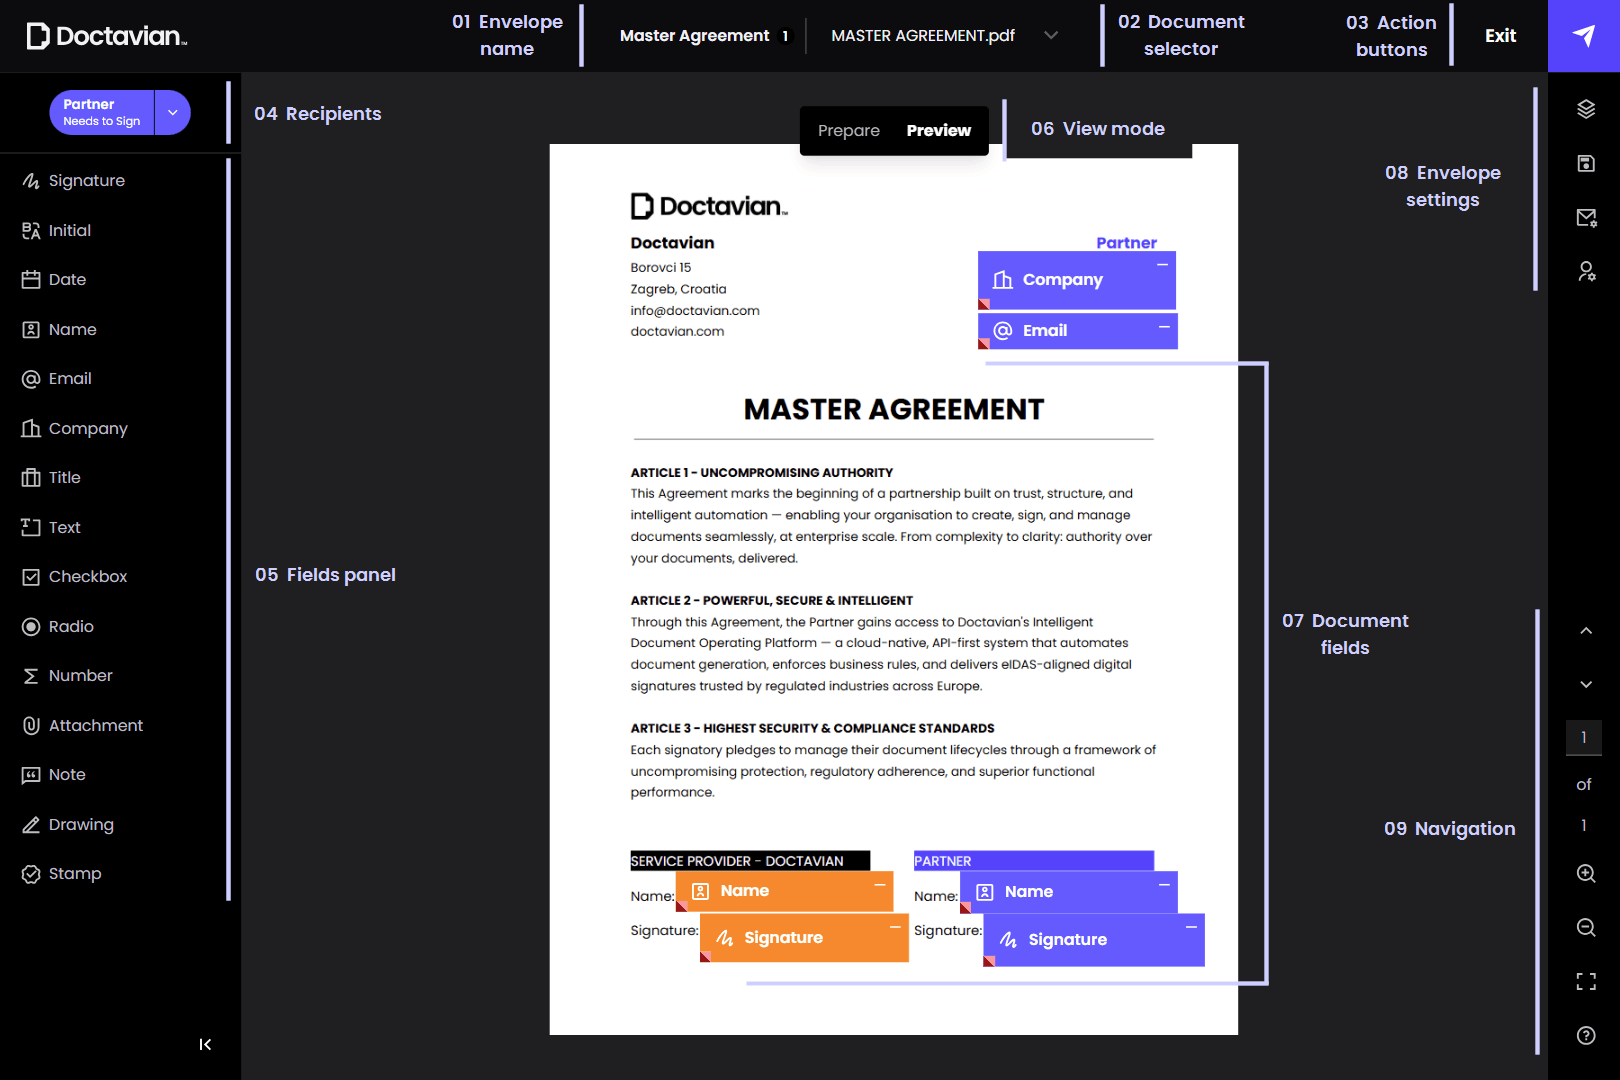
The editor is divided into four main areas:
- Top bar — envelope name, document selector, and action buttons.
- Left sidebar — the available fields panel and recipient selector.
- Center — the document canvas where fields are placed.
- Right sidebar — envelope settings and page navigation.
¶ Top bar
¶ 01 Envelope name
Displayed at the top center. Shows the name of the envelope or template being edited.
¶ 02 Document selector
A dropdown next to the envelope name listing all documents attached to the envelope. Switch between documents to place fields on each one.
¶ 03 Action buttons
- Exit — Opens a pop-up asking whether to exit without saving, save changes, or continue editing.
- Save / Send — For envelopes, sends the envelope to recipients once all required fields have been placed. For templates, saves the template and closes the editor.
¶ Left sidebar
¶ 04 Recipients
The recipient selector appears in the top-left corner of the editor. Click it to switch between recipients and assign fields to each one. Each recipient is color-coded — fields placed for different recipients appear in distinct colors on the document, making it easy to see at a glance which fields belong to whom.
¶ 05 Fields panel
The left sidebar lists all field types that can be dragged onto the document. Drag any field from the sidebar and drop it onto the desired position on the document canvas.
| Field | Description |
|---|---|
| Signature | A signature field. The recipient's saved signature is applied here when they sign. |
| Digital Signature | A digital signature field validated by a PKI certificate. Unlike a standard signature, this requires the recipient to use a smartcard, keystore, or Windows keystore to validate their identity at the time of signing. |
| Initial | An initials field automatically populated from the recipient's name. Used to acknowledge specific sections of a document without a full signature. |
| Date | A date field. Automatically populated with the date the recipient signs the document. |
| Name | A name field. Automatically populated with the recipient's name. |
| An email field. Automatically populated with the recipient's email address. | |
| Company | A company field for the recipient to enter their organization name. |
| Title | A title field for the recipient to enter their job title. |
| Text | A free-text field for the recipient to enter any text input. |
| Checkbox | A checkbox the recipient can check or uncheck. |
| Radio | A radio button for single-choice selection among a group of options. |
| Number | A numeric input field. Validated to accept numbers only when filled by the recipient. |
| Attachment | Allows the recipient to attach a file as part of their response. |
| Note | A read-only text note visible to the recipient but not filled in by them. |
| Drawing | A freehand drawing field the recipient can draw in. |
| Stamp | A stamp field for applying a predefined stamp image to the document. |
Fields with automatic population — Name, Email, and Date — are filled in automatically when the recipient signs and do not require manual input. Other fields are validated when the recipient fills them in, for example the Number field only accepts numeric values.
The fields panel can be collapsed using the arrow button at the bottom of the left sidebar, giving more space to the document canvas when needed.
¶ Center
¶ 06 View mode
A floating toolbar appears at the top center of the canvas. Hover over it to reveal two modes:
- Prepare — the default mode where you place and configure fields on the document.
- Preview — shows how the document will look to recipients, without the editor interface. Use this to verify field placement before sending.
¶ 07 Document fields
The document canvas displays the document with all placed fields visible. Fields are color-coded by recipient — each recipient has a distinct color so it is immediately clear which fields belong to whom. Drag fields from the fields panel onto the canvas to place them, or click an existing field to select it and open its properties panel. Fields can be freely repositioned by dragging them to a new location on the page.
¶ Field properties
Clicking a placed field on the document canvas opens a properties panel with five tabs:
| Tab | Description |
|---|---|
| Position & Size | Set the exact position (X, Y coordinates) and dimensions (width, height) of the field on the document. |
| Text styling | Configure the appearance of text inside the field — font size (6–72), font family, text alignment (left, center, right), text style (bold, italic, underline), and text color. |
| Properties | Configure field behavior:
|
| Duplicate | Creates a copy of the field with the same size, styling, and properties. |
| Delete | Removes the field from the document. A confirmation prompt appears before the field is deleted. |
For information on how signed documents are protected against tampering, see FAQ — Can a signed document be tampered with after signing?
¶ Right sidebar
¶ 08 Envelope settings
The right sidebar contains four icon buttons for envelope-level settings, and page navigation at the bottom.
| Button | Description |
|---|---|
| Pages preview | Opens a panel showing thumbnail previews of all pages in the current document, organized by document name. From here you can add a new document to the envelope or delete an existing one. |
| Save | For envelopes: save as a draft, save as a template, or download the document. For templates: save the template or download the document. |
| Envelope settings | Edit the message, reminders, and expiration settings set during the wizard. Changes here override the wizard settings. |
| Recipient settings | Opens a panel listing all recipients with their name, email, role, and color indicator. Each recipient can be edited or removed directly from the panel. You can also add a new individual recipient or a recipient group without leaving the editor. |
¶ 09 Navigation
Below the settings icons, the navigation controls let you manage your view of the document:
- Previous / Next page — move between pages of the current document.
- Page input — type a page number directly to jump to it. Shows current page and total page count.
- Zoom in / Zoom out — increase or decrease the document zoom level on the canvas.
- Fullscreen — expands the canvas to fill the browser window.
- Help — opens help resources for the fields editor.